Cleaning windows with vinegar is an effective, eco-friendly solution to achieving streak-free shine. This age-old method harnesses the natural cleaning power of vinegar, making your windows sparkle without the use of harsh chemicals. In this article, we will guide you step by step on how to clean your windows with vinegar, ensuring they are clear, streak-free, and sanitized.
Benefits of Cleaning Windows with Vinegar
Opting to clean windows with vinegar offers numerous advantages. Firstly, vinegar is a natural and non-toxic cleaner, which makes it safe for use around children and pets. Secondly, it is an inexpensive alternative compared to commercial window cleaners. Finally, vinegar is highly effective in cutting through grime, grease, and hard water stains, leaving your windows crystal clear.
Another significant benefit is its capability to disinfect surfaces. Vinegar contains acetic acid, which has antimicrobial properties perfect for killing germs and bacteria. Furthermore, because it is environmentally friendly, vinegar does not contribute to air or water pollution. This makes it an ideal choice for those who are eco-conscious and looking to reduce their chemical footprint.
Materials and Tools Needed
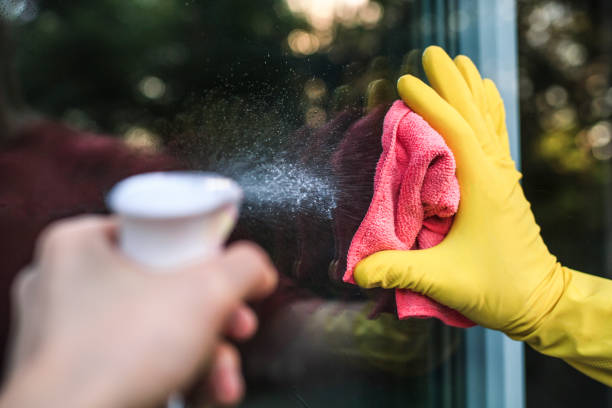
Before you start cleaning your windows, gather all the necessary materials and tools. This will make the process smoother and more efficient. Here is a list of what you will need:
- White vinegar
- Water
- Spray bottle
- Microfiber cloth or soft lint-free towel
- Bucket
- Squeegee (optional)
White vinegar is preferred due to its strong cleaning properties. A spray bottle will help evenly distribute the vinegar solution on the windows, while a microfiber cloth is excellent for wiping without leaving lint behind. A bucket is useful for making larger batches of the solution if you are cleaning numerous windows. Lastly, a squeegee can help achieve a streak-free finish.
Preparing the Vinegar Solution
The key to effective window cleaning with vinegar lies in the preparation of the solution. Follow these simple steps to create your vinegar cleaning solution:
- Fill a spray bottle halfway with white vinegar.
- Fill the remaining half with water.
- Shake the bottle well to ensure the vinegar and water are properly mixed.
If you are dealing with particularly dirty windows, you might want to increase the concentration of vinegar by using a 2:1 ratio of water to vinegar. This stronger solution will be more effective in tackling stubborn grime and stains.
Steps to Clean Your Windows
With your vinegar solution ready, it’s time to start cleaning. Here’s a step-by-step guide to help you achieve spotless windows:
- Begin by removing any loose dust or dirt from the window surface using a dry microfiber cloth.
- Spray the vinegar solution generously onto the window.
- Let the solution sit for a few minutes to break down dirt and grime.
- Wipe the window with a microfiber cloth or soft lint-free towel in a circular motion.
- If using a squeegee, start at the top of the window and drag it in a straight line to the bottom, wiping the squeegee blade with a dry cloth after each pass.
- Buff the windows with a dry microfiber cloth to remove any remaining streaks.
This method ensures that your windows are thoroughly cleaned without leaving behind any streaks. For best results, clean your windows on a cloudy day to prevent the solution from drying too quickly.
Extra Tips for Cleaning Windows
For even cleaner windows, consider these additional tips. First, always use a microfiber cloth, as it’s designed to trap dirt without scratching the glass. Second, avoid cleaning windows in direct sunlight, as this can cause the vinegar solution to evaporate too quickly, leaving streaks behind. Finally, if you encounter any stubborn spots or hard water stains, apply vinegar directly to the area and let it sit for a few minutes before wiping clean.
Moreover, regularly cleaning your windows can help prevent the build-up of grime and make the cleaning process easier over time. By following these tips, you will maintain sparkling clean windows with minimal effort.
Conclusion
Cleaning windows with vinegar is a simple, cost-effective, and eco-friendly method that yields excellent results. By gathering the right materials, preparing the vinegar solution correctly, and following the outlined steps, you can easily achieve streak-free, crystal-clear windows. Incorporate these tips into your regular cleaning routine to enjoy consistently clean windows without the hassle of harsh chemicals.
FAQs
Is vinegar safe for all window types?
Yes, vinegar is safe for all types of windows, including those with film and tints. However, it’s always wise to test a small area first to ensure there is no reaction.
Can I use vinegar to clean windows with a lot of built-up grime?
Yes, vinegar is effective in cutting through built-up grime. For very dirty windows, consider using a higher concentration of vinegar to water.
How often should I clean my windows with vinegar?
It is recommended to clean your windows at least twice a year. However, for optimal clarity, you might want to clean them more frequently, especially if you live in a polluted area.
Can I add essential oils to the vinegar solution?
Yes, adding a few drops of essential oils to your vinegar solution can help mask the vinegar smell and add a pleasant scent to your cleaning solution.
Why should I avoid cleaning windows in direct sunlight?
Cleaning windows in direct sunlight can cause the vinegar solution to dry too quickly, which can leave streaks on the glass. It’s best to clean on a cloudy day or avoid direct sunlight.